 As told to Friday 15th February 2019 12th February 2018: The Cortina had sat in the trailer and then the workshop since the 2017 National Finals. Although I had started her and also cleaned her, the replacement brake master cylinder had been purchased but not fitted. In February, Bill and I had spent a day removing the Cortina from the trailer and had removed and identified the master cylinder. Like most dead racecars, there is not much you can do with them, so as I said it had been fired up, put through a heat cycle and cleaned. Wednesday 30th May 2018: Back again, yes, it's been far, far too long, unfortunately for the Twin Turbo Cortina blog, it has had to take a bit of a back seat up till now. Not gonna make excuses, but the winter meant that getting to the track was not easy. We all know what Easter was like so to be fair we didn’t miss much. Add to that as most of you know I opened Rockingham Dragstrip and stuck to my mantra of not driving at any event I organise. So opportunities to drive have been thin on the ground to say the least. Add to that the fact that Bill Felstead has been very busy building three Nostalgia Funnycars along with all the usual work, etc, etc. You get the picture I am sure. So where does that leave us? Well there was not an opportunity to drive the Cortina at the FIA Main Event, due to Sefton Whitlock our Dragster Crewchief being ill with shingles, which is especially nasty when he was misdiagnosed initially and it got a good hold of him. So I cancelled my entry and crewchiefed the Dragster myself for Mick Howling and Martin Curbishley. 31st May 2018: Bill and I met at the workshop and got cracking on sorting out the Cortina with a view to running at Classic Ford, before I got banned from Santa Pod. I now realised as most of us do that a racecar out of sight is out of mind. Before when the Cortina was at my place we worked on it all the time. But you put it in a workshop and that all changes. Now the couple of hours here and couple there, plus when the sun shines you can crack on, that all stops when its locked away. So that is a lesson learned and if I want to progress this project then I need to have it where I can see it. This is one of the reasons why so many cars simply don’t get finished, because its hard to get enthusiastic when its not staring at you every day. Okay well there was alot to do today, first job was again to clean it as it was dusty!! Then I got to checking the water injection system which I know was not working, its the usual two connections, which one is the right one. I made the wrong choice, so it didn’t work, this might possibly solve our bad AF (Air Fuel Ratio) problem. I kinda doubted it would, but we needed to cross it off the list. Once reconnected, I then removed the bleed nipple and turned the ignition on which allows the water injection pump to pressurise the system. On doing this the jet of water hit the ceiling, so I can say it works now!! Whilst doing this Bill was on fitting the new brake master cylinder, which we had matched the best we could. Another job that needed doing was the fitting of some more Dzus’s on the back of the bonnet as it was bowing up alot at speed. I had not noticed it as I was too busy keeping it in a straight line but the crew had. So I fitted two Dzus’s to the bulkhead and attached a pair of the larger Pro Stock style ones. This looked like it would do the job, its common for air to get trapped inside the engine compartment on a doorcar. Bill got the new brake master cylinder fitted and with the help of Gary Springford from DRE and his power brake bleeder we got a pretty good pedal. Bill also removed a cover on the footwell and linished it back a bit for some better pedal travel. It was then time to fire up and check the brake pedal and do a systems check, the fire up was pretty straight forward. I reversed the car out of the workshop and took a little drive around the car park to ensure the brakes worked okay. No major problems there, so now we were pretty sure that we were in fact going. Classic Ford had sent us tickets to run demo, unfortunately they were not running the Heads Up Face Off this year so it was just demo. That was probably a blessing in disguise as we needed to work on the AF ratio, so my plan from the offset was out to the 1/8th and then download the data. Unless you race yourself or crew with a race team, you just have no idea how much work is involved in loading everything you need to go racing. I am not going to list it all as you would all be asleep before I would be finished, but trust me it took another six hours before all was locked and loaded. A 6.00am start Saturday morning at the workshop and a huge amount of time and effort before we were ready. Leaving around 10.30am for the track with the RV and trailer in tow. Arrived around 12.30pm, met up with all the crew at the gates at Santa Pod, Sefton was well enough now, so it was great to see him (he had had shingles), Aaron Springford, who has passed his driving test now, drove up, also Lisa and Jay, plus Bill and Luke from Comanche Racecars. We then spent the majority of the afternoon setting up the pit area, attached the nine foot wheelie bars, prepped the Cortina, charged the batteries etc. Sefton, Aaron and I were on the motor, I needed to go through the valvelash and also I wanted to do a valvespring seat pressure check as we had yet to do one. I knew it was all fresh when I bought the Cortina from the Moose but now 20 odd runs later it needed checking. That all took a couple of hours and we found no horror stories, the seat pressure was 200+ which was okay for what we were doing this weekend. 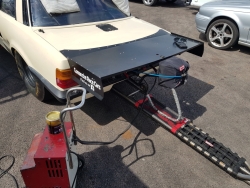
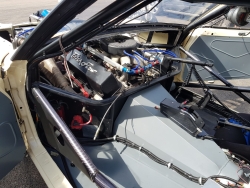
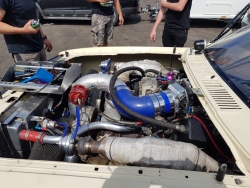
The Classic Ford event is always an event we enjoy, nice, hot and sunny, friendly organisers and it's full of knowledgeable car enthusiasts and some stunning cars as well. The time was ticking and as yours truly had not driven a racecar for the best part of nine months, I needed to get back in the saddle. On the good side was the fact that the Cortina had been the last car I had driven at Santa Pod, the bad thing was this is an extremely complicated racecar to drive, and there is a lot to remember. So once signed on I then drove down the staging lane and got suited and booted as it was not that busy. The track was as you expect with street tyred cars, not great, I knew that. I just wanted me and the crew on the same page really. Just to recap, I wear Funnycar boots, Funnycar gloves, Flameproof Headsock, all the usual race suit and HANS device with this one, you just can’t be too careful. I fired up and drove round, went to do a burnout and the linelock just would not hold and pulled me through, so I backed up for another go and virtually the same thing happened. I backed up and the crew did all their usual stuff, Sefton switched on the logger and armed the Accusump. Then it's down to me, up to the line, transbrake on, build up boost, not too much as I am fairly certain the track won't be there. Bump in with the bump buttom, light the full stage bulbs, tree runs and I ping it, hooks immediately right like it did last year. I pedal it momentarily, pull her back and hit the shift, I remembered this time to drive one handed so as I am ready for the shift the moment the light comes on. Short shifted into second and took her as far out as I could, just about made 1/8th mile kind of and clicked it. No need to use the chute, but the brakes are not what we needed, got stopped and actually made first exit no drama. I drove back to the pits, get out of the gear and got changed, no point in going out again, same as last year, the track just can't hold what we have. Downloaded the logger and checked the data, no timing ticket available so no idea how she hooked, the logger showed that TPS (Throttle Position Sensor) was all over the place. So all we did was learn the car again and put a lap in, good enough for today and nothing fell off and it all kinda worked. Bill and Sefton got cracking on the brakes, I ended up sitting in the Cortina with it running checking out the linelock, I was pumping the brake pedal to make sure there was plenty of pressure when bang the pedal went to the floor and I very nearly run over the bonnet! A brake line failed and hence we lost all pressure in the brake system, so now we had a clue to the weak brake, Bill was going home so said he would bring back a brake pipe kit and we could remake the pipe. Come Sunday and we had three scheduled runs, the first being 10.00am, so there was plenty to do in the morning to ensure we were ready. To save time, we decided that I get fully dressed and in the Cortina in the pits before leaving so we were ready upon arrival in the lanes. This worked, but when we got there unfortunately was a crash on the track, so our plan all went a bit wrong. But it was still a good plan, the first run would be simple with the water injection now working; we would see how this affected the AF ratio on the logger, so I needed to get it out cleanly to the 1/8th mile so we had good data. In agreeing to this, I had done a deal with Bill that I wanted him to try one flat of preload in the 4-link rear suspension, in an attempt to get it to go straight off of the startline. Up till now this Cortina never went straight, it always went right, so my first job when driving was always save the car from the wall, which was getting a bit tedious. Chassis builders always aim for a car that goes straight without any preload, but alot of cars need something, so I wanted to try and in the end Bill allowed it. The burnout was good and the linelock held okay, so that's fixed, Sefton armed everything as usual, up to the line, bumped her in but didn’t put it up to full boost, I let her get aggressive but not downright snotty. Pinged it and low and behold the Cortina went straight for the first time, hit the 1-2 gearchange and we are still straight, hit the bump around 400ft out and she moved a bit but I was out of it on the 1/8th so no dramas there. I came back and parked in the pits, again no chute, so I just drove back. I got changed and downloaded the data to see what had gone on, it was good data, 6lb in the manifold on the launch, same as yesterday, shifts were clean and good, but the AF ratio was the same as before. The water injection had not worked, but at least now we knew. We cooled her down and set to work on the wiring to see if we could find out why. Let me just say the wiring on this Cortina has so far been faultless, a credit to Jon Sleath, because despite all our best efforts it still worked! Plus there is A LOT of wiring in an EFI fuel injected data logged racecar. So we traced the wiring back and found the relay and worked out what triggered it and it came down to it not switching earth on the relay which was triggered by the ECU, you got that? I also saw from the data logger that our TPS (throttle position switch) was only registering 75% at wide open, which maybe a reason why the water injection was not triggering as even when triggered it still is boost controlled. But we figured that it would be better to wire the water injection up to a switch for the earth so as Sefton could arm it just before the run, this way we could see if it worked without wasting another run. The second run was 2.00pm so we only just got everything back in one piece in time to make the call. I again went down all suited and booted, and ran quite quickly. Burnout was much better this time, although the crew didn’t notice just how much smoke was actually in the Cortina, and I was having trouble seeing at one stage! Sefton armed the logger, Accusump and the water injection, I built up the boost and bumped in, pinged it and again went straight, hit the shifts driving again one handed and clicked it at the 1/8th mile. We ran an 8.90 which actually stood as the fastest run of the weekend surprisingly. Drove back and downloaded the data, the AF figures were a little better and the water injection had worked but it was still not where we needed it to be. I asked about for some advice and eventually met Tony Higgs who has a 540ci Twin Turbo Capri, Tony also runs FAST EFI and kindly came over and had a look at it for me. Unfortunately his system was a newer version so couldn’t help me but I appreciated his offer. I spoke to Darren Scannel (Cosworth Turbo Mk 1 Yellow Escort) who suggested putting up the base pressure. So as the last run was 4.00pm time was running out, we took base fuel pressure from 45psi to 60 psi with the car running. Once set I got changed and strapped in, went to start the Cortina and it was having none of it so I kinda guess we flooded it with the extra fuel pressure. So that was that, till next time. That said, the Cortina now goes straight and the water injection works. So good progress had been made and it's always a good day when you leave the track with a car in one piece. 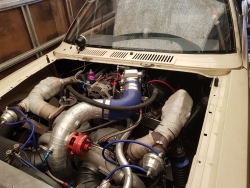
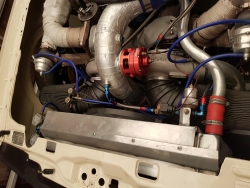
Meanwhile a roundup of 2018: Yes, it's been a while since this was updated, but 2019 will be different. The Cortina is healthy and in one piece. Nothing to do with it being broken, just the small matter of running Rockingham Dragstrip and consequently not being welcome at Santa Pod anymore. So the Cortina kinda sat dormant. Yes, the Whoopass Monza and Grumpy's Dodge both had outings at Rockingham and also a trip to Jurby Dragstrip on Isle of Man, but no Cortina. Now the Rockingham Dragstrip is no more due to the entire facility being sold off to be used as a lease car refurbishment hub and auction house. I also had another trip over to the States and returned with more knowledge after attending No Mercy 9 at SGMP, Georgia, and Street Outlaws No Prep Kings at Galot, North Carolina. I also passed by ART (Applied Race Technology) to buy a new tubular front A-Arm kit from Corky Markwart over in Tampa. Then I saw my pal Tim Maines who announces at Orlando Speedworld and works at American Motorsports Speedshop in Orlando, FL. It was great to catch up with Tim and also to buy consumables, gaskets, plugs, filters, etc. Tim is big into his Fords and is currently building another simply gorgeous 60’s Ford musclecar, no not a Mustang! Yes it will be a streetcar......Well, kind of. Friday 11th January 2019: With the UK No Prep Series now hitting the road in 2019, we have made the decision to compete with the Cortina in big tyre. It's mainly going to be to develop the car but if we are going to do that, we had better get the upgrades done. We know that the motor is running a little on the lean side on the A/F Ratio. We cannot seem to figure out why, so a trip to John Sleath's dyno is on the cards to figure it out, to be honest we are pretty lucky its been so reliable so far as its been in bits quite a lot! The first job we wanted to do was fit a Wilson Manifold elbow, this is what the throttle body bolts to and what sits on the intake manifold. This couldn’t be used before due to the packaging issues with the engine setback, but with the way we have built the new dash, there is now room. This will help eliminate any potential air turbulence in the plenum chamber and make access easier when servicing the motor. It also moves the throttle body much closer to the intake. All of which may make it a little faster in its current setup, more importantly it could help reduce air temperature, which on a turbo motor is welcome. That said, the dyno will tell us what difference it makes, if any. The other purpose of the dyno visit is to be able to put bigger tunes into the mapping as it is still just running on a road map. There is a lot more available. Before we did any on that however, with a brand new battery fitted, we fired her up and did a full systems check to ensure all is well before we started pulling it all apart. The fire up went smooth, there were no issues whatsoever. Then it was time to start removing stuff. The main job today was to remove the airbox that the throttle body is attached to and feeds the intake manifold. As with all these builds, its full of compromises due to packaging. Bill and I removed all the sensors and pipes that are attached to the airbox and carefully tagged each one so we knew what it was and where it went. With the airbox removed successfully, we ran out of time. 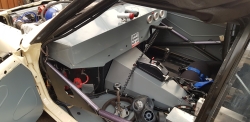
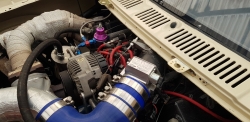
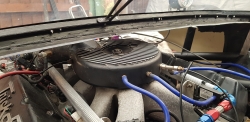
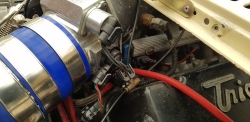
Sunday 13th January 2019: With the airbox out of the way, it was now time to carefully disconnect and tag all the wiring harness that ran through the floor of the intake. Believe me, there is alot of wiring and it sure took some time to remove and tag it all, about 30 wire connections in all. Then we removed the the fuel injection rails and fuel pipes, etc. Once all that was done, it was time to remove the intake, as you may realise this was not an easy task. It's fitted so it does not leak and it has to withstand alot of psi. So its a slow process of loosening it as much as possible before attempting to remove. After alot of patience, it came loose and I removed it. Looking in the valley, on initial inspection, there was nothing broken or unhappy. With the top end in pieces, it will be dismantled and all the valvetrain will be inspected for wear and damage. The Wilson Manifold elbow will be fitted backwards and we will use a 180 deg union to redirect the pipework directly over the manifold, hopefully allowing enough room to be able to service the motor without removing the cold side pipework. This is quite a common way of routing the cold side intake pipework, hopefully it works for us! We might get away with just a 90 degree union, but it's doubtful. We were trying to avoid going into the screen, as this will mean alot more work for little gain, but we shall see, there ain't no book on this stuff, you have to make it work yourself! So in the meantime, we can fabricate a landing plate for the elbow and weld it to the intake Manifold. The once the elbow/unions arrive we can see just how tight they turn, you want it to turn as tight as possible for efficient packaging, there is never enough room! Once we have figured out the best plan, it should be a relatively simple case of reconnecting everything back up, re-plumbing the sensors and vacuum pickups back into the new Wilson elbow and away we go. Sounds simple enough? 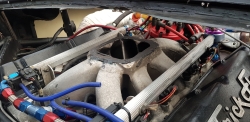
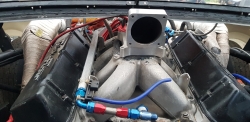
Friday 18th January 2019: The 90 degree cast elbows arrived and are a really nice tight turn, perfect for this application. They had to be made of cast as you just could not get this in mandrel formed tube, the bend was too tight. Saturday 19th January 2019: The manifold itself was in good condition but was a little grubby, due to a lot of road use and it being pretty tricky to get to, prior to Bill and myself getting started on the Cortina. So I took it to Matt Wright and his Vapour Blasting business. This is a real nice way of cleaning soft metals, which in this case was exactly what we were dealing with. It came out looking like it just came out of the casting, perfect. If you want a quote for vapour blasting call Matt on 07980 211869, he also does chrome spraying on plastic bumpers and other hard to find stuff, call him. 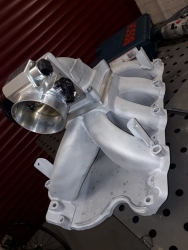
Tuesday 22nd January 2019 : I dummied up the intake and cast 90 degree elbows to then work out the paths open to us regarding the cold side pipework. Looking carefully, I figured we could return down one side of the intake manifold and then angle across a little and pickup the long 90 degree from the intercooler. This was a much more direct route, so would package nicely. I ordered a 90 degree bend, a 45 deg bend, 1 m of straight and 2 more tight 90’s. This gave us the materials to work with, you always have to order more than you need because until you start working in real sizes you just cannot be sure. Saturday 26th January 2019: I then touched base with Andy Fireman, who is a good friend of mine and has a little machine shop business. Andy is very tidy, and perfect for the job of fabricating the pieces to attach the Wilson elbow to the intake, and then the throttle body to the Wilson elbow. Despite them both being 92mm diameter, the bolt pattern was completely different, so an adaptor was needed. 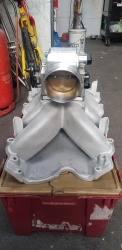
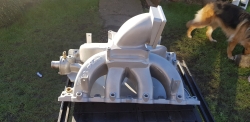
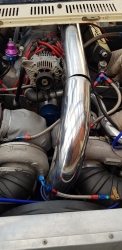
Sunday 3rd February 2019: I picked up the finished piece from Andy, lovely job done, then it was time to seal it. As it was in an ‘as cast’ condition it needed to be sealed so it didn’t get dirty very quickly. After a lot of asking, I decided to put it in clear 2 pack laquer as it was the simplest and should be hard wearing. Sunday 10th February 2019: All the gaskets for the Wilson 90 deg elbow to manifold and Wilson elbow to F.A.S.T. Big Mouth 92mm Throttle Body had to be hand made, which did take a while, I still had some gasket paper left over from working on the Pro Stock Motor from the PT Bruiser, so spent a couple of hours making those, which came out fine. All the aluminium pipework arrived during the week, so i spent some time Sunday refitting the intake manifold. Then taped the two 90deg tight cast elbows together and mounted them to the throttle body. By using two 90’s we could also twist them a little as the throttle body angles down and the pipe face needs to angle up to pick up the pipework square from the turbos, so that was a nice little result. Then tried the straight pipe to ensure it cleared the injector rails and the front scuttle, as I said before its always a packaging job when dealing with a door car. This appeared to work but only just, which was good enough. 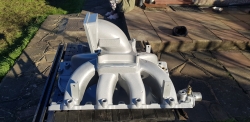
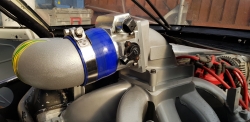
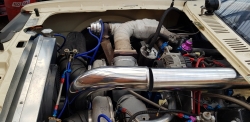
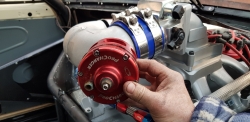
Thursday 14th February 2019: Bill and I had a day on the Cortina were on the cold side intake re-plumbing today. I had two options of how to run it, plan A and Plan B. With these jobs, you only want to cut tube once, so the name of the game is only cut a little at a time as its alot more difficult to stick it back on! Well I showed Bill what I had done and told him of the two options so he knew where we were. Bill liked Plan A, it's always best to get another person’s perspective on these kind of things, in case you had missed something. Another thing we were trying to avoid if possible was having to go through the bonnet in odd places to get the pipework in. So after spending about an hour looking at different options, it was time for the first cut. We decided to cut the straight first, and then see where we were with the 90 out of the intercooler. Once cut it kinda fell on to the pipe so close that we realised that we could probably get away without having to use the 45deg bend at all and just use a larger silicone coupler that allows for a little angle,( 5 -10 degrees) in its construction. So we would be good with just that. Bill tack welded the two 90 deg elbows, then it was decision time for the BOV (blow off valve) positioning. Current thinking says that you need it as close as possible to the throttle body, so we looked at the options and decided right on top of it worked best. The dash will have to be modified anyway on account of the height of the throttlebody, so it just means that the additional piece will be bigger. The dashboard is removable and is a non structural piece so it's a lot easier to modify than cutting the screen and the scuttle panel out. All in all a good day, not a lot physically done but a big step forward in the right direction and it looks real cool as well. 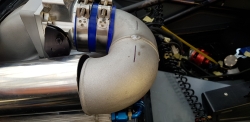
Feature ©Eurodragster.com 2016-17 Blog Back to Racer Blog index |